
VirtualBox VM setup on Windows
Most Windows systems now have enough resources to run both a hypervisor and a VM. The main constraint is disk space — make sure you have room for the OS image plus extra storage. If you plan on running intensive services inside the VM, you’ll also want to bump up the RAM and CPU cores it’s allowed to use. Questions any time — ask in Discord.
Download and extract the software
- VirtualBox: virtualbox.org/wiki/Downloads
- 7-Zip: 7-zip.org
- Kali: kali-linux-2024.3-virtualbox-amd64.7z
- Kali for Hyper-V (optional): kali-linux-2024.3-hyperv-amd64.7z
Not sure what to do with these files? See the Windows installation guide or ask in Discord.
Kali setup on VirtualBox
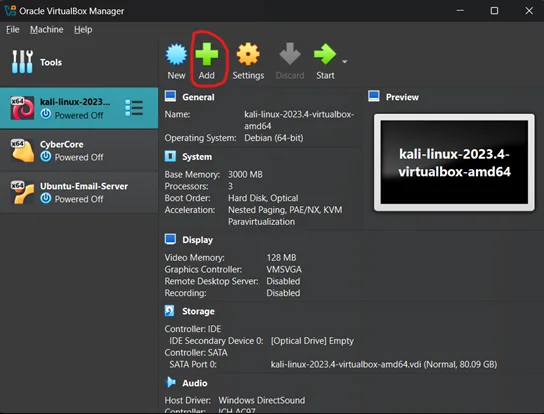
Step 1: Add the Kali VM
Open VirtualBox and click “Add.”
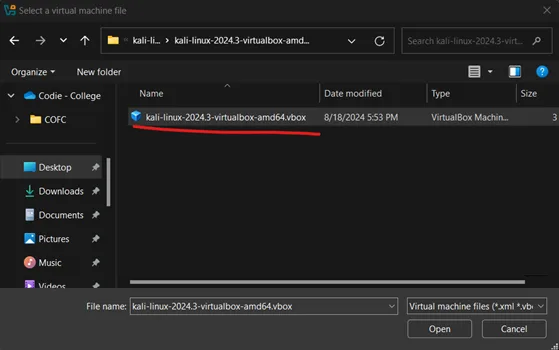
Step 2: Select the Kali folder
Navigate to the extracted Kali folder, select the .vbox file, and click “Open.”
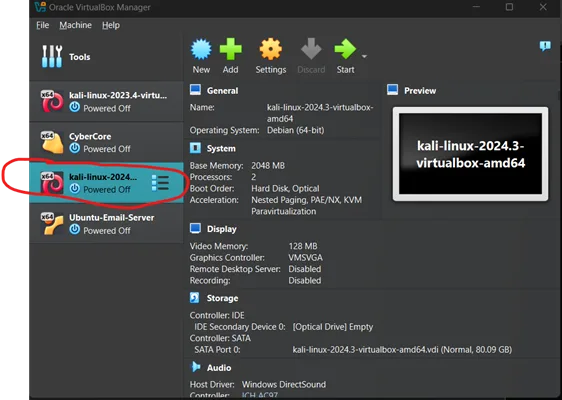
Step 3: Launch the machine
Double-click the new Kali machine.
Step 4: Sign in
Wait for Kali to boot. Username and password are both kali.
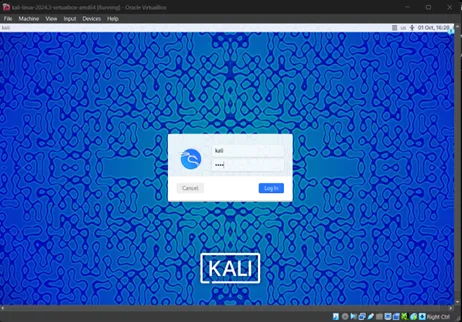
Your Kali VM on VirtualBox is all set.
Hyper-V VM setup on Windows
This part is optional — VirtualBox or VMware both work fine on their own. Hyper-V isn’t an officially supported feature on Windows 10/11 Home, though it can still be enabled. Setup here can get a little involved, so ask in Discord if you get stuck. Enabling Hyper-V on an edition that doesn’t officially support it may also brush up against the EULA, worth knowing going in.
Hyper-V is also picky about resources — it may not work well on systems with less than 8GB of RAM.
Reference links:
Step 1: Check compatibility
- Press Windows key + R, type
msinfo32, press Enter. - In “System Summary,” scroll down to “Hyper-V Requirements.”
- If it says “Yes,” or “A hypervisor has been detected. Features required for Hyper-V will not be displayed,” you’re set.
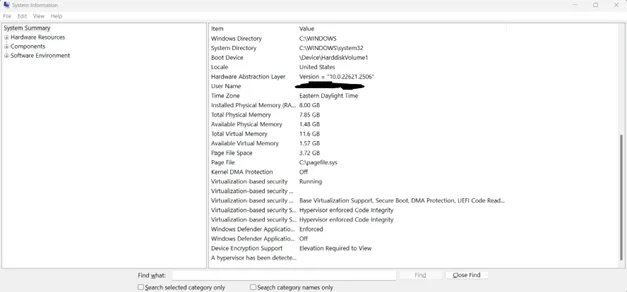
Step 1.5: Windows 10/11 Pro or above — enabling Hyper-V
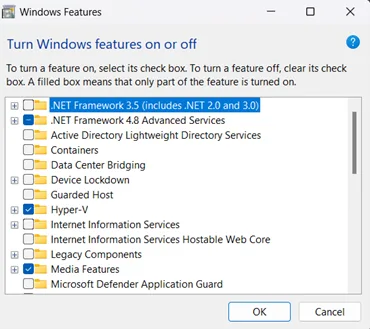
- Press Windows key + R, enter
appwiz.cpl. - Click “Turn Windows features on or off.”
- Check “Hyper-V,” click OK, let it install, then restart.
Step 2: Enabling Hyper-V on Windows 10/11 Home
The slightly more involved path:
- Right-click the desktop → New → Text Document.
- Paste this into it:
pushd "%~dp0"
dir /b %SystemRoot%\servicing\Packages\*Hyper-V*.mum >hyper-v.txt
for /f %%i in ('findstr /i . hyper-v.txt 2^>nul') do dism /online /norestart /add-package:"%SystemRoot%\servicing\Packages\%%i"
del hyper-v.txt
Dism /online /enable-feature /featurename:Microsoft-Hyper-V -All /LimitAccess /ALL
Pause
- File → Save As → rename to
Hyper-V.bat→ Save. - Double-click
Hyper-V.batto run it (right-click → Run as administrator if needed). - When install finishes, restart when prompted.
- Press Windows key + R, enter
appwiz.cpl. - Click “Turn Windows features on or off.”
- Check Hyper-V, Virtual Machine Platform, and Windows Hypervisor Platform, then click OK.
- Restart.
Step 3: Kali on Hyper-V
- Click “Quick Create.”
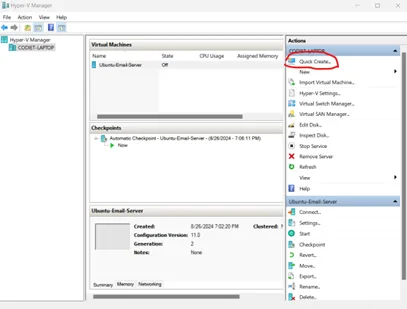
- Click “Local Installation Source.”
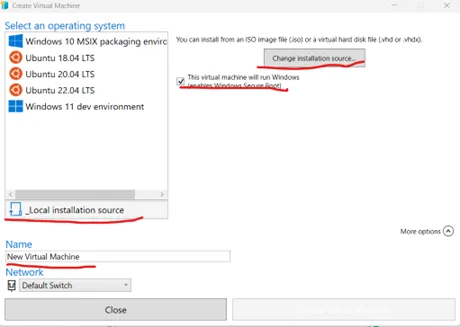
- Deselect “This virtual machine will run Windows.”
- Click “Change installation source” and navigate to your extracted Kali
.vhdxfile. - Rename the virtual machine if you want.
- Click “Create Virtual Machine.”
- Once it’s fully loaded, username and password are both
kali.
You’ve set up a Kali VM on Hyper-V.